Getting Started With SignalR Using ASP.NET Core : Using Xamarin Android - Part 7
In this article, we’ll learn how to get started with SignalR using Xamarin Android. Along with SignalR stack, the .NET client was also released with it. You can use this .NET client with any .NET application like console app, WPF app, and Xamarin.Android.
Introduction
In this article, we’ll see real-time communication with the Xamarin Android App where you can add the real-time functionally to an Android app like real-time notification, streaming data, pushing real-time graphical data, and many others.
SignalR Client - Client for ASPNET Core SignalR
The SignalR Client was also released along with SignalR. It is targeted to .NET Standard 2.0 so the client supports the .NET framework 4.6.1 or greater and .NET Core 2.1. This client is used to connect with Hub which is created in ASP.NET Core SignalR. It has HubConnectionBuilder class which builds the HubConnection.
The HubConnection takes care of connecting to a hub, invoking any method from the client, and registers a handler that will be invoked when the hub method with the specified method name is invoked.The purpose of this SignalR client is to just consume the Hub which is already created/hosted.
This client helps to communicate with the existing hosted hub only. We can’t do any Hub related changes using this client. Let’s say you have a hosted web application with Hub context. Now, you want to use that Hub in your Android app to add real-time functionality.
This article is a part of the series on SignalR using ASPNET Core.
- Overview of New Stack SignalR on ASPNET Core : Introduction - Part 1
- Getting Started With SignalR Using ASP.NET Core : Using Angular 5 - Part 2
- Getting started with SignalR using ASPNET Core : Streaming Data using Angular 5 - Part 3
- Getting started with SignalR using ASPNET Core : Dynamic Hub - Part 4
- Getting started with SignalR using ASPNET Core : Azure SignalR Service - Part 5
- Getting started with SignalR using ASPNET Core : Using MessagePack Protocol - Part 6
- Getting Started With SignalR Using ASP.NET Core : Using Xamarin Android - Part 7 (this article)
This article demonstrates the following.
- Creating Xamarin Android Project
- Creating SignalR Client
- Consuming Client in Xamarin Android
- Streaming data from Server
- Demo
The source code is available at Github on below links.
Before reading this article, I would highly recommend you to go through the other articles of the series which are mentioned above.
Creating Xamarin Android Project
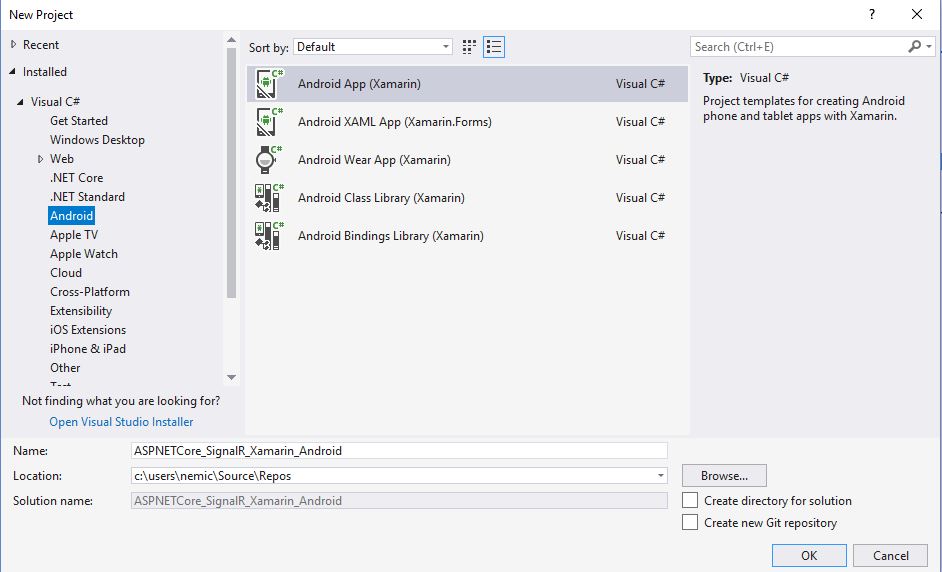
Let’s create a Xamarin Android project in Visual Studio. For that, click on File --> New --> Project. Choose the Android category on the left side and click on the Android App (Xamarin) project. Refer to the below image.

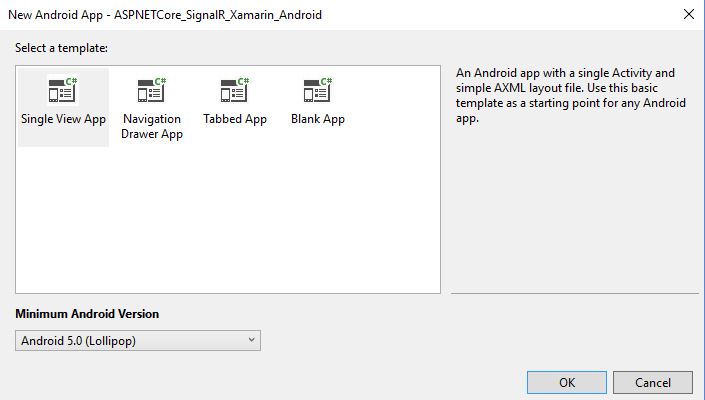
Select a template. I’m going to select basic template “Single View App”; other options are a Blank app, Tabbed app, and Navigation App. This is the list of templates available to create an Android app. You can choose the minimum Android version support.

Creating SignalR Client
Now, we have to install the first SignalR client for Android app.
Nuget Package
Install-package Microsoft.AspNetCore.SignalR.Client
Now, we are going to create HubConnection with the help of HubConnectionBuilder. HubConnectionBuilder.withUrl() takes care about the hub URL to be connected and you may specify the transport protocol which you want to connect through. If you haven’t mentioned transport protocol, then it will use the default mechanism to choose protocol between client and server to connect it. It has a fallback mechanism while establishing the connection so if the protocol is not supported by client and server, then it will look for other protocols.
1
2
3
4
//creating hubconnction
var hubConnection = new HubConnectionBuilder()
                    .WithUrl("enter your hub url here")   //TODO enter your hub url here
                    .Build();
Register a handler that will be invoked when the hub method with the specified method name is invoked or subscribe for stream to listen.
1
2
3
4
5
//resgistering the events
hubConnection.On<string>("ReceiveMessage", (message) =>
{
    //TODO handle here your messages
});
So, we have created SignalR client and registered the events to receive data from the hub.
Consuming Client in Xamarin Android
Now, before sending or receiving any message/data, we need to start the connection first by calling StartAsync method.
1
await hubConnection.StartAsync();
After establishing a connection, we can send data to the hub clients. To send data to the hub-client, we call the InvokeAsync method. This method requires the name of the hub method to be called and data to send.
1
await hubConnection.InvokeAsync("SendMessage", new ChatMessage() { message = messageText.Text, user = "Android" });
Streaming data
Invokes a streaming hub method on the server using the specified method name and return type. HubConnection has a method called “StreamAsChannelAsync” which takes method name and optional 10 arguments. It returns ChannelReader to read data from the channel. We have to wait for data to be available for reading. Once the data becomes available on the channel, it will read the items from the channel. In this article, I’m going deep with Xamarin Android Client only; if you are interested in the server-side streaming part, then refer to the below article here.
This article helps to understand how data is pushed from server to client. This article has captured more about streaming. I would highly recommend you to go through this article.
In the above code, you can see that stream item is reading from ChannelReader and updating item to list view to populate the changes. I’m using ArrayAdapter with list of stock items to show to stock items in the list.
Demo

Summary
In this article we have learned how to consume SignalR Hub in Xamarin Android client. We have learned the following things:
- Creating hubconnection with hub url.
- How to start hub connection by calling
hubconnection.StartAsyc()and invoke a method by callinghubconnection.InvokeAsyc() - Reading data from channel reader using StreamAsChannelAsync method.
References
 Never miss a story from us, subscribe to our newsletter